In today’s rapidly evolving digital landscape, deploying and managing database objects efficiently is crucial for maintaining the agility and scalability of modern applications. Azure SQL Database, a fully managed relational database service provided by Microsoft, offers a robust platform for storing and managing data in the cloud. Leveraging Azure DevOps Continuous Integration and Continuous Deployment (CI CD) pipelines streamlines the process of deploying SQL database objects, ensuring consistency, reliability, and rapid iteration. In this blog post, we’ll delve into the step-by-step guide of how to implement Azure SQL Server CICD pipeline using Azure DevOps.
Prerequisites:
1.Service connections in Azure DevOps project for each resource groups containing Azure SQL databases.
Create a database project and link it to Azure Repos
When setting up a CI/CD pipeline for Azure SQL Database, it’s essential to understand how to create a DACPAC file and utilize Visual Studio to a database project from it. This project then needs to be integrated with Azure Repos for setting up an automated build and deployment pipeline. In case you already have this setup, you can skip this section.
Create a DACPAC file
A DACPAC (Data-tier Application Component Package) file is a portable representation of a SQL Server database schema, making it crucial for efficiently managing database changes. Follow the steps mentioned in this post to learn how to create it. If you already have a database project, you can skip this step.
Create a database project from the DACPAC file
Once the DACPAC file is ready, integrating it into a Visual Studio project becomes imperative for further development and deployment. Detailed instructions on opening a DACPAC file in Visual Studio can be found in the guide
Link database project with Azure Repos
Create a repo in Azure DevOps under the DevOps organization project and link the database project with it. Follow the steps mentioned in this post to learn about it.
Setup Azure SQL Server CICD pipeline
Once we have Azure repo ready for Azure SQL database projects, let us now implement SQL DACPAC deployment Azure DevOps pipeline.
Enable access to Azure Key Vault from Azure DevOps pipelines
To connect to Azure SQL Database from Azure DevOps deployment pipeline, we need to fetch database credentials from Azure Key Vault. Follow the steps mentioned in this article to enable access to Azure Key Vault secrets from Azure DevOps pipeline.
Create a new pipeline in Azure DevOps project
It’s time to set up a deployment pipeline for the Azure SQL database.
1. Login to Azure DevOps portal and navigate to the DevOps organization. Select the DevOps project containing the database Azure repo we created in the above step.
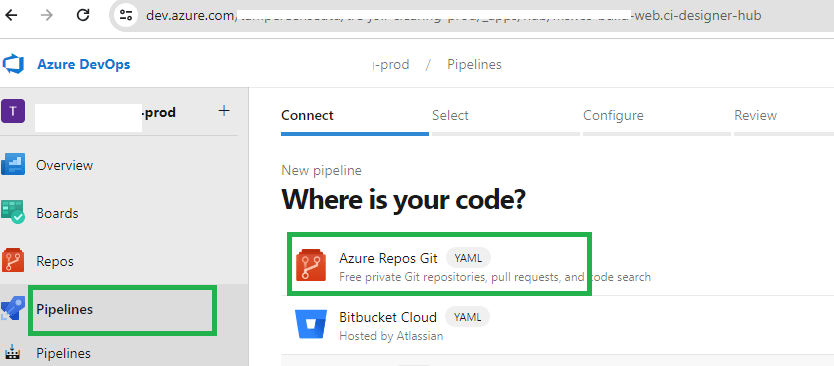
2. Select Pipelines and Click ‘New pipeline’ button to create a new pipeline.
3. Select ‘Azure Repos Git’ as a source of your code.

4. Select the Azure repo containing the database project we created in previous steps.

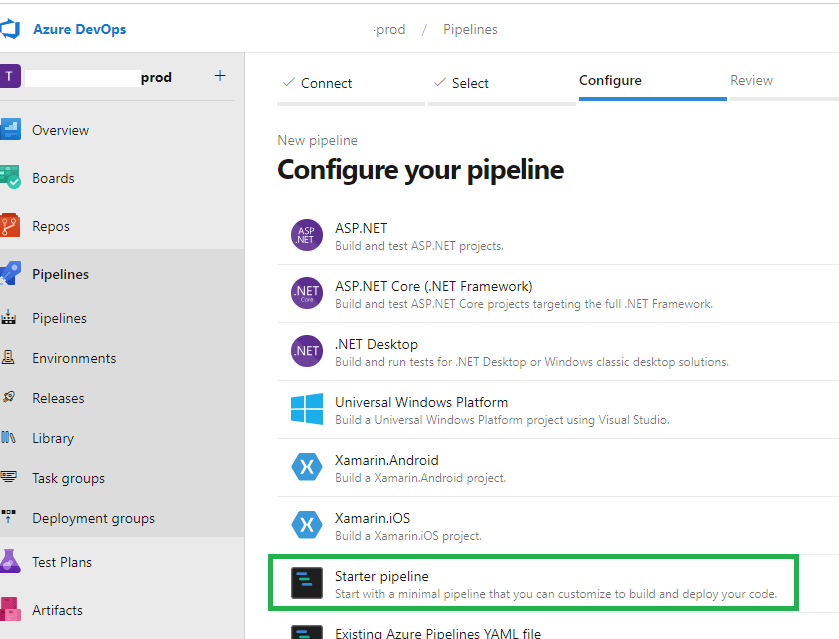
5. On the Configure screen, select the ‘Starter pipeline’ option as shown in the image below.

6. Add below YAML code to the editor on Review screen and make necessary changes as per your environment. You can use YAML pipeline tasks to generate the code snippets based on your parameter values.

trigger:
# Name of the main (master) branch of the Azure DevOps repos.
- main

variables:
  vmImageName: 'windows-latest'
  solution: '**/*.sln'
  buildPlatform: 'Any CPU'
  buildConfiguration: 'Release'

stages:
- stage: build
  displayName: Build Stage
  jobs:
  - job: Build
    displayName: Build
    pool:
      vmImage: $(vmImageName)
    steps:
    - task: NuGetToolInstaller@1
    - task: NuGetCommand@2
      inputs:
        restoreSolution: '$(solution)'
    - task: VSBuild@1
      inputs:
        solution: '$(solution)'
        platform: '$(buildPlatform)'
        configuration: '$(buildConfiguration)'
    - task: CopyFiles@2
      inputs:
        SourceFolder: '$(agent.builddirectory)'
        Contents: '**/bin/$(buildConfiguration)/**'
        TargetFolder: '$(build.artifactstagingdirectory)'
        CleanTargetFolder: true
    - task: PublishBuildArtifacts@1
      inputs:
        PathtoPublish: '$(build.artifactstagingdirectory)'
        ArtifactName: 'drop'
        publishLocation: 'Container'

- stage: dev
  displayName: Dev Deploy Stage
  dependsOn: build
  condition: and(succeeded(), ne(variables['Build.Reason'], 'PullRequest'))
  jobs:
  - deployment: Deploy
    displayName: Deploy Dev
    pool:
      vmImage: $(vmImageName)
    environment: dev
    strategy:
      runOnce:
        deploy:
          steps:
          - task: AzureKeyVault@1
            inputs:
             # Enter name of the service connection created to deploy resources to dev Azure SQL database.
              AzureSubscription: 'dev-service-connection-name'
             # Enter name of the key vault that stores Azure SQL database credentials.
              KeyVaultName: 'dev-keyva'
             # Enter comma separated names of the key vault secrets that store the Azure SQL database credentials.
              SecretsFilter: 'azuresqldb-dbconnstring'
              RunAsPreJob: true

          - task: SqlAzureDacpacDeployment@1
            inputs:
             # Enter name of the service connection created to deploy resources to dev Azure SQL database.
              AzureSubscription: 'dev-service-connection-name'
              AuthenticationType: 'connectionString'
             # Provide the database connection string variable value to ConnectionString parameter. (key vault secret name)
              ConnectionString: '$(azuresqldb-dbconnstring)'
              DeployType: 'DacpacTask'
              DeploymentAction: 'Publish'
              # Provide path of the dacpac file. Replace 'AzureOps.Sql' with name of your AzureRepo and AzureOps.Sql.dacpac with name of your database dacpac file.
              DacpacFile: '$(Pipeline.Workspace)/drop/s/AzureOps.Sql/bin/Release/AzureOps.Sql.dacpac'
              AdditionalArguments: '/p:DropObjectsNotInSource=true /p:BlockOnPossibleDataLoss=true /p:IgnorePermissions=true /p:ExcludeObjectTypes="Users;Permissions"'
              IpDetectionMethod: 'AutoDetect'

# similarly, customise below block of code for test environment deployment.
- stage: test
  displayName: Test Deploy Stage
  dependsOn: dev
  condition: and(succeeded(), ne(variables['Build.Reason'], 'PullRequest'))
  jobs:
  - deployment: Deploy
    displayName: Deploy Test
    pool:
      vmImage: $(vmImageName)
    environment: test
    strategy:
      runOnce:
        deploy:
          steps:
          - task: AzureKeyVault@1
            inputs:
              AzureSubscription: 'test-service-connection-name'
              KeyVaultName: 'test-keyva'
              SecretsFilter: 'azuresqldb-dbconnstring'
              RunAsPreJob: true

          - task: SqlAzureDacpacDeployment@1
            inputs:
              azureSubscription: 'test-service-connection-name'
              AuthenticationType: 'connectionString'
              ConnectionString: '$(azuresqldb-dbconnstring)'
              DeployType: 'DacpacTask'
              DeploymentAction: 'Publish'
              DacpacFile: '$(Pipeline.Workspace)/drop/s/AzureOps.Sql/bin/Release/AzureOps.Sql.dacpac'
              AdditionalArguments: '/p:DropObjectsNotInSource=true /p:BlockOnPossibleDataLoss=true /p:IgnorePermissions=true /p:ExcludeObjectTypes="Users;Permissions"'
              IpDetectionMethod: 'AutoDetect'
Note:
You can add AdditionalArguments to SqlAzureDacpacDeployment task like DropObjectsNotInSource=true which will drop objects from the database which do not exists in DACPAC file. Read more about all the properties supported in SqlAzureDacpacDeployment. Exercise this with caution.
Review and test the pipeline
Click on ‘Run pipeline’ button to manually trigger the pipeline and test if the pipeline works without any issues.

How to Manually Deploy DACPAC project to Azure SQL Database
Refer to this post if you want to deploy DACPAC project to Azure SQL database using Visual Studio.
Pro tips:
1. When publishing a DACPAC, the pipeline might fail with potential data loss errors. Customize the publish parameters according to your specific requirements in such cases.
2. Before implementing a block for production deployment, it’s advisable to thoroughly test the pipeline in lower environments. This ensures that any issues or bugs are identified and resolved before reaching critical stages of deployment.
3. To prevent unintended code deployments to higher environments, incorporate mandatory approvals at each stage of deployment. This ensures that changes are reviewed and approved before progressing to the next environment, maintaining the integrity of the deployment process.
4. If you come access error ‘A project which specifies SQL Server 2022 or Azure SQL Database Managed Instance as the target platform cannot be published to Microsoft Azure SQL Database v12., follow this article to resolve the issue.
See more
Kunal Rathi
With over 14 years of experience in data engineering and analytics, I've assisted countless clients in gaining valuable insights from their data. As a dedicated supporter of Data, Cloud and DevOps, I'm excited to connect with individuals who share my passion for this field. If my work resonates with you, we can talk and collaborate.
