In today’s fast-paced world, efficiently sharing files is crucial. If you’re looking for a way to automate sending blob files stored in Azure Blob Storage directly via email, then look no further than Logic Apps! In this blog post, learn how to send blob files via email using Logic Apps. We will see how to set up a Logic app workflow that retrieves all blob file content and seamlessly attaches it to an email notification.
Prerequisites:
1. Azure Storage account in Azure resource group with some blob files.
2. Azure logic App services created in Azure resource group.
3. Office 365 email account for sending emails.
Grant access to Azure Logic app on Azure Storage Account
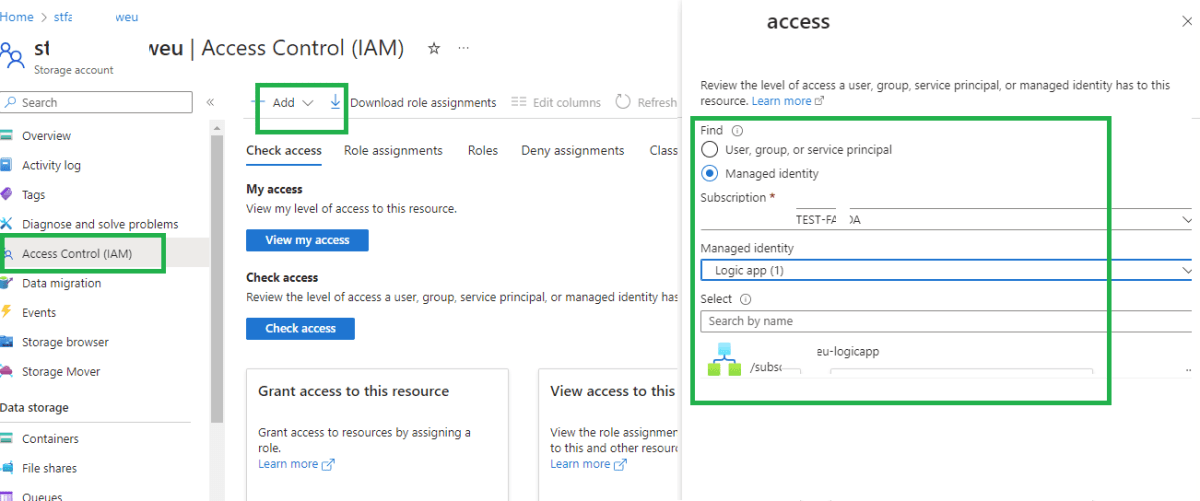
To access Azure storage blob files from Azure logic app, we can grant managed identity access to Azure logic app on Azure Storage Account.
1. Navigate to Azure storage account resource in Azure portal and ‘Access Control (IAM)’. Click the ‘Add’ button and search for the Azure Logic Apps resource.
2. Click Save.

Set up Logic app workflow to send blob files via email
Open Logic app designer under ‘Development tools’ of Logic app. Define a trigger for the flow. There are various trigger options available. For this post, I have chosen a recurrence schedule as a trigger that runs the flow at a specified frequency.
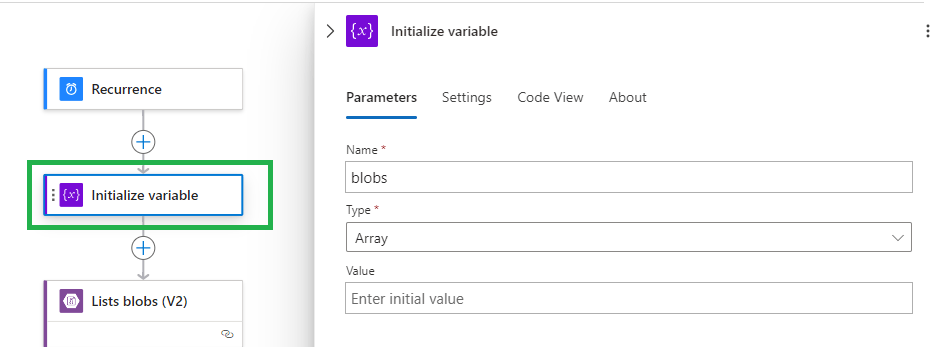
Click ‘Add an action’ button under the trigger. Use the ‘Initialize variable’ task and define a variable of type array (named blobs) that will hold all the attachments to be sent over email. For now, keep its Value blank.

Get the list of blobs from the storage account
1. Get the list of blob files from Azure storage account that we need to send over email. Use the ‘List blobs (V2)’ task as shown in the below image.
2. At the bottom of the task, Click the ‘Connection’ button and create a new one. Provide a name to the connection and choose ‘Logic Apps Managed Identity’ as an Authentication Type. And Click Save. This will create an API endpoint for Azure Storage Account resource. This API connection can also be seen under ‘Development tools’ in Logic app.

3. Once the connection is established, provide the name of the Storage Account in ‘Storage Account Name or Blob Endpoint’ field.
4. Provide the Folder path. You can use expression if you have a dynamic folder structure e.g. dated folders.
5. Choose other settings as per your needs or leave them as default.
Iterate blob files from the storage account
Iterate all the blob files that we need to send over email and append the content of the files to the array variable blobs that we defined earlier.
1. Use the ‘For each’ task after the ‘List Blobs (V2)’ task. Click the task header and use the value variable from the ‘List Blobs (V2)’ task outcome. This variable holds metadata of all the blobs discovered from the ‘List blobs (V2)’ task.

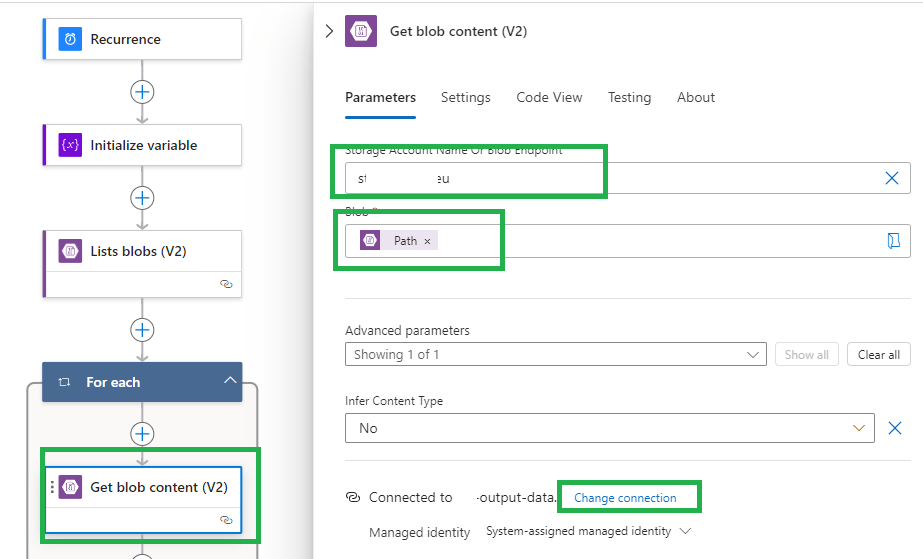
2. Get each blob content from the storage account using the ‘Get blob content (V2)’ task. On the connection setting, choose the same connection for the storage account we created for the ‘List blobs V(2)’ task.

3. Provide the name of the storage account under ‘Storage Account Name or Blob Endpoint’. For ‘Blob’, use the Path variable. Path variable is the outcome of ‘For each’ task iterator and it holds the path of the current blob file.
4. Keep other settings as default and click save.
5. Use the ‘Append to array variable’ task after the ‘Get blob content(V2)’ task. Choose blobs variable from the Name drop-down. This is the same variable that we had initiated earlier.

6. For the value section, use the below expression.
{
  "ContentBytes": "@{body('Get_blob_content_(V2)')?['$content']}",
  "Name": "@{items('For_each')?['Name']}"
}
Send email attachments using the Send an email(V2) task
We are all set to send the attachments via email.
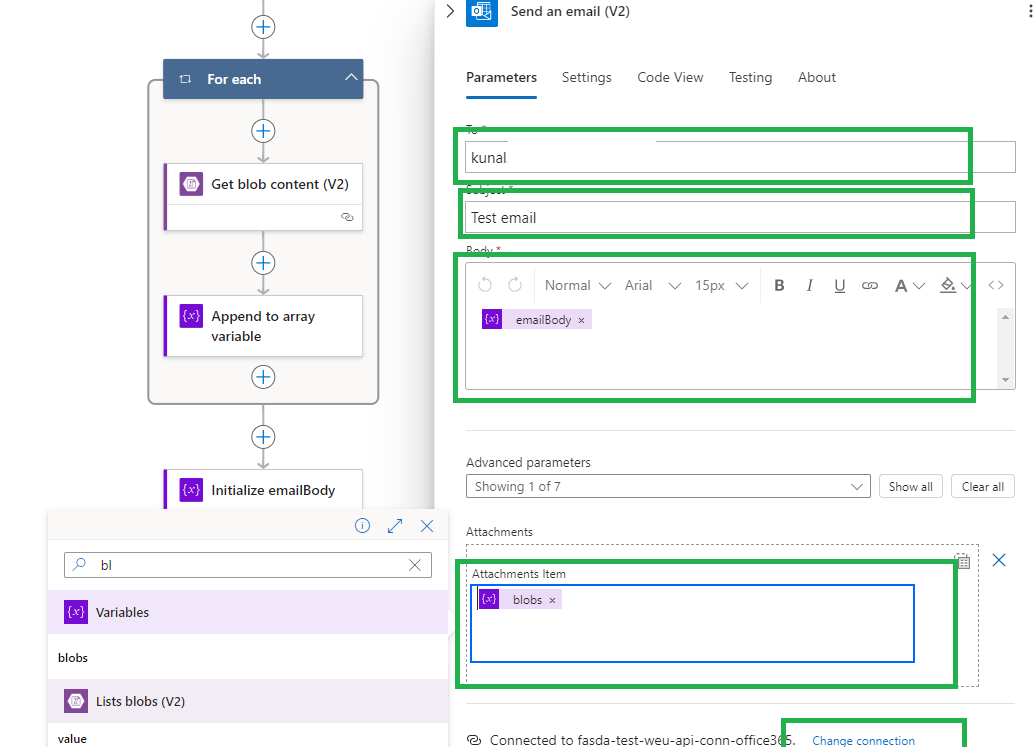
1. Use the ‘Send an email(V2)’ task just after the ‘For each’ task as shown in the below image.
2. To use this task, create an Office 365 connection. This will be the email address that will be used to send emails. Click the ‘Connection’ button at the bottom of the task and sign in using your Office 365 account. This will create an Office 365 API connection resource in Azure resource group.
3. Once the connection is created, provide To, Subject, and Body variable values to the task. It is possible to initialize the HTML body using a custom variable.
4. To enable Attachments, click ‘Advanced parameters’ and choose ‘Attachments’. Click on the right corner of the attachments to ‘Switch to input the entire array’ mode.
5. Use blobs variable as an expression for this section. This variable holds all the attachment content.
That’s it! The Logic app workflow is ready to send files from the storage account as an email attachment.
Test the workflow
To test the workflow, Click the ‘Run’ button in the Logic app. This will run the workflow and if everything goes well, the receiver will receive an email with all blob files attached in an email.
Pro tips:
1. This post covers the basic workflow to send blob files via email using Logic Apps. You may need to add workflow logic in case there are no blob files available in the storage account. This will avoid failures in the Logic Apps.
2. Refer to this post to learn how to automate Azure SQL database deployments using Azure DevOps.
See more
Kunal Rathi
With over 14 years of experience in data engineering and analytics, I've assisted countless clients in gaining valuable insights from their data. As a dedicated supporter of Data, Cloud and DevOps, I'm excited to connect with individuals who share my passion for this field. If my work resonates with you, we can talk and collaborate.


