If you are working with SQL Server Reporting Services (SSRS), one of the most common requirements is to download all SSRS Reports from Server in a single operation. This is especially useful when you want to migrate reports to another environment, back them up, or simply analyze the structure of your SSRS instance.
Traditionally, administrators had to download each report manually from the Report Manager portal, or write complex scripts using SSRS SOAP APIs. Both approaches are time-consuming and prone to errors. Fortunately, there is now an easier way to achieve this: using the SSRS Reports Migration Wizard.
What Is the SSRS Reports Migration Wizard?
The SSRS Reports Migration Wizard is a tool from AzureOps designed to help you migrate SSRS content (native mode) between servers or to/from an SRMW export file.
It supports migrating:
- Folders
- Reports
- Shared datasets
- Shared data sources
- Subscriptions
- Roles
The wizard gives you a guided interface to select exactly which objects to migrate, and optionally adjust connection strings along the way.
When to Use Export + Import via SRMW File
Using an export file gives you flexibility:
- You can create a backup snapshot of your reports/datasets/data sources
- You can move content offline — export on one server, then import later on a different server
- It helps in server upgrades, consolidation, or reorganizing your SSRS environments
If you prefer a direct server-to-server migration, that’s also supported by the wizard. But export/import via file is safer and useful, especially when network access or permissions between servers is constrained.
Step-by-Step: Exporting SSRS Items to SRMW File
Here is a step-by-step walkthrough of how to carry out the export. You can follow along with the video, or use these instructions with screenshots in your own environment.
1. Launch the Migration Wizard
- From SQL Server Management Studio (SSMS), open the SSRS Reports Migration Wizard.
- (If installed as an extension, you’ll find it under the Tools menu.)
2. Start the Export Process
- Click Next to begin.
- Enter the source SSRS web service URL (e.g.
http://yourservername/reportserver) along with domain credentials. - Click Connect to load the contents of that SSRS instance.
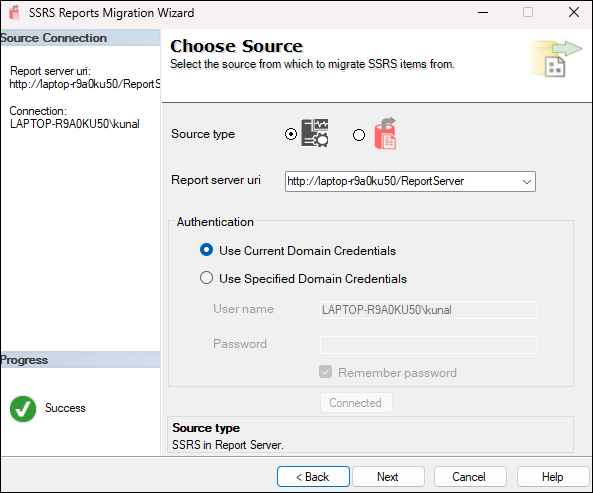
3. Select the Export File Target
- On the next screen, choose the SRMW file option as your export target.
- Browse to the folder where you want the export file to be saved.
- Specify a file name (for example,
MySSRSExport.srmw). - Click Next to continue.

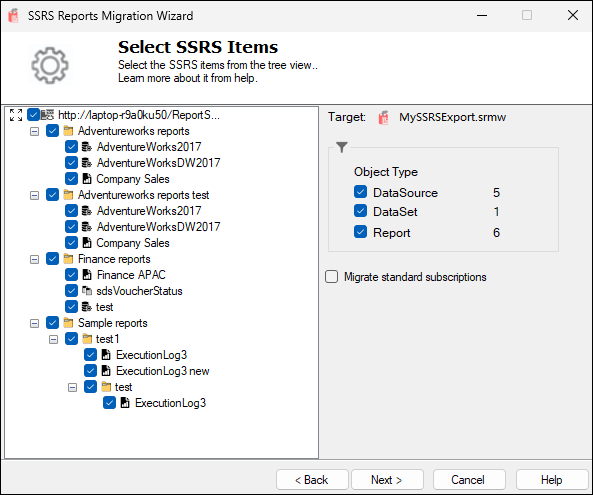
4. Choose SSRS Items to Export
- You’ll see a tree view of all SSRS objects: folders, reports, datasets, data sources.
- Check the boxes next to the items you want to export.
- After your selection, click Next.
5. (Optional) Update Data Source Connection Strings
- On the next screen, you can update the connection strings and credentials for data sources.
- These settings will be baked into the SRMW file and used when you later import the content.
- If you don’t need to change anything, you can skip this.
- When ready, click Next (or Finish, depending on wizard layout).

6. Review & Confirm
- The wizard will show a summary of what will be exported.
- Confirm your selections and click Finish (or Export) to start the process.

7. Complete Export & Verify
- The wizard runs, exporting all chosen items into your SRMW file.
- When it completes, open File Explorer and navigate to the export folder you chose.
- You’ll see the
.srmwfile. - (Optionally) You can unzip or inspect its contents to verify that your reports, datasets, and sources are included in the proper folder structure.

What’s Inside the SRMW File & How It Helps
The SRMW file is essentially a packaged archive that contains:
- Report definition files (RDLs)
- Dataset definitions
- Data source metadata (connection strings, credentials)
- The folder hierarchy (to preserve navigation/organization)
- Standard subscriptions definition, etc.

When you later run the wizard’s Import mode, the tool reads this file and recreates the selected SSRS items into the target server.
Using this intermediate file gives you:
- A portable, versionable package
- A safety buffer (you can inspect or edit before import)
- The ability to stage/migrate content in controlled stages
Pro tips:
1. Test first with a limited set of reports to ensure everything works as expected.
2. Double-check your data sources — mismatches or missing credentials are common issues.
3. Use clear naming conventions for your export file (with timestamp) so you know which export is which.
4. Keep a backup of your export file in a safe location.
5. Make sure the target SSRS server is compatible in terms of version and features.
6. Check permissions: the account you use must have sufficient rights on the source SSRS items.
7. Learn how to migrate SSRS report server items from one report server to another.